
-
Icon by AceofHadeon Sig by TrueRomantic
sigpic -
Hello Gimps, i made the tut but please be polite because my english is not so good . i hope you like it ...
I don’t remember exactly how I did it but I’ll try..
Ok so lets make the Bg of this Sig:

Textures : Texture 1, Texture 2, Texture 3, Texture 4.
by sanami and crazykira on deviant art.com
Gradients Set :
http://www.deviantart.com/download/26019800/set_05.zip
Edit : all the images were resized in the center of the sig ,with the exception of texture #3 .
And the gradient on ‘layer mask’ to hide the edges will have to look like this:
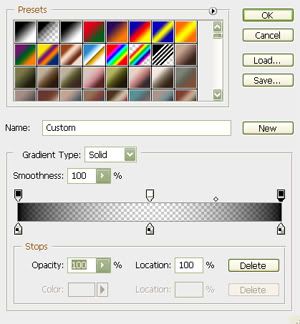
1-Create a new document and fill the Background :
#92a2b2 or RGB: 164 -162- 178.
2- Add Texture1 and set it to ‘soft light’ and use the ‘layer mask’to hide the edges with the ‘gradient tool’.
3- Add Texture 2, resize the image to fix in the document and set it to ‘soft light’, hide the edges with the ‘layer mask tool’ again like step 2.
4- Add Texture 3, set it to ‘overlay’.
5- Add Texture 4, set it to ‘luminosity’, use the ‘layer mask’ again and hide the edges, put the layer with the texture 1 above all layers.
6- (shift+Ctrl+Alt+E) to make a stamp of everything, delete the other layers.
7- Duplicate the layer , desaturate it and set it to ‘soft light’ .
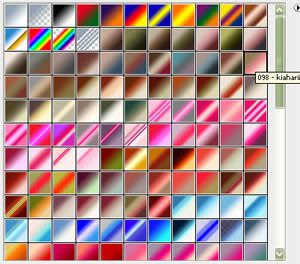
8- go to image>adjustments>gradient map. And choose one gradient of the set called : 098 – kiaharii (just pass the mouse slowly above the gradients to know their names) just in case, it will look like this:
9- In the bottom layer: go to image>adjustments>hue/saturation . set those values : (in the saturation section)
Master: +30
Reds: -15
Yellow: 15
10- go to image>adjustments>color balance:
Shadows: -5 -15 -10
Midtones: 25 20 -10
Highlights: -15 -10 -20
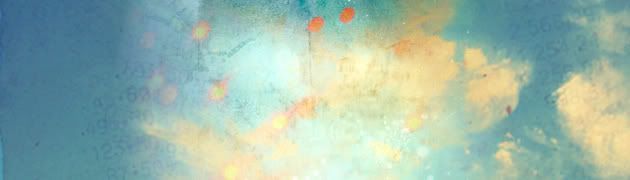
11- Make a stamp and delete the others. it is done
Edit: ² it is not 100% equal to the sig, I’m sorry for that but it was all I could remember. and i didn't used the magnetic lasso tool to cut Carter i used the 'layer mask' with a gradient to set her in the bg.
it will loook like this:
 sigpic
Comment
-
Thanks for the tut Rachel.
sigpicComment
-
Nice sig LiliJ
Thanks for the tut Rachel, love those textures
I made a wp

Comment
-
Thank you for the tut Rachel going to try that out....soon! sigpic
Comment
-
Am I allowed to guess what next week's challenge is about? The reason we're all sending Oma a sig that best shows our individual 'styles'? Because I have just had this idea.........Comment
-
Lovely sig, LiliJ! And Rachel, thanks for the nice tutorial!sigpicThanks to Oma-1 for the beautiful banner!Comment
-
Nice sig Lili and love the wp Jumble! Great to see what the infamous kitchen wall looks like
Thanks for the tut Rachel and for all the textures, they're gorgeous. I really really need to figure out layer masks Do any of the other Gimp people know how to get them to work? If so, could they please write an idiot's guide tut? *looks at Oma*
sigpic
Artwork for All | Sig & avi by JadedWraithComment
-
*sigh* Nice to see RDA/Jack is represented. I'm feeling the pull...might change my sig and avatar back to Jack soon...Originally posted by jumble View PostsigpicComment
-
-
I would if muse would come back, but she's run away somewhere - probably off with my fanfic museOriginally posted by josiane View Post
Lili what type of file are you uploading? because I create and save my stuff as psimage files, which are huge but then save them again as a jpg so I end up with a 2nd much smaller copy. I dunno it might help with the fuzziness *shrug*sigpicMy FanficComment
-
Hey, I was looking for tuts on layer masks and come accross these helpful hints for Gimp:
I didn't know you could do that!As you paint, use the bracket keys to increase or decrease the size of your brush.
[ makes the brush smaller
] makes the brush larger
Shift + [ makes the brush softer
Shift + ] makes the brush hardersigpicComment
-
-
I didn't find one. yes, they are all quite confusing, and assume a level of proficiency that is beyond me.Originally posted by josiane View PostsigpicComment
-
I find that too LJ, that's why this thread is so helpful cos I find it easier to understand a tut from PS and work out how to do it in Gimp than to read a Gimp tut! Is that crazy or what? If I'm really desperate for a Gimp tut I usually go to YouTube
 ")
Ok, um idiots guide to layer masks.....its too simple even to be an idiot's guide
Make sure you have the pic higlighted that you want to blend. Right click on the layer in the Layers Window. It comes up with a whole list of options. About half way down is "Add Layer Mask". Click OK for the default one (I haven't experimented with the others - yet).
Next select Gradient. Make sure it's set for black foreground, white background, 100% opacity, or it won't work.
Then, go to the image window, click and drag the cursor over the layer where you want it to blend in. Where you click first will be 100% transparent, blending to 100% opaque. You can just keep clicking and dragging until you get the effect you want.
Finally, when you're happy with the blend, right click on the layer in the Layer Window again and select "Apply Layer Mask".
I'm not on my computer right now so I can't do pics I can do them later if anyone wants them.
sigpic
I can do them later if anyone wants them.
sigpicComment


Comment