
Here is the tutorial that lg asked for.
Here is how I made this in Photoshop: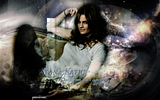
Create a new document. I chose mine, 1280x800, because that is the size of my screen resolution. Fill with Black.
Take this texture:
Move around until you are happy with it.
Take this texture:
Set to Screen, 25%. Move around until you are happy with it.
Take this texture:
Set to Screen, 100%. Make sure that the left side is lined up with the left side of your document.
Take this texture:
Set to Multiply, 100%. Move around until you are happy with it.
Take this image of Stana and scale down just a little bit. I think I scaled down to 75%. Set to Screen, 100%. Do not erase anything unless it is in the way of the textures and make sure she is on the left side to middle of the document.
Create a new blank layer and move underneath the pic of Stana. With a black brush bring Stana and some of the chair she is sitting in back to the forefront. You don't have to be perfect, just make sure you can see all of her. Then with your favorite blending brush and the eraser opacity at about 50%, begin blending in the black, along with Stana, with the background. However much or little blending is your choice.
COLORING
Make sure you're on the top most layer, which should be Stana (Or whomever you chose).
Black and White: Auto, set to Soft Light, 100%.
Hue/Saturation: 0, -35, 0
Curves: Point 1: 191, 209. Point 2: 100, 106
Gradient Map: Washed Away Art #15, Set to Soft Light, 100%.
Create a stamp. Filters>Blur>Gaussian Blur. Just Blur enough that you can still tell what the art is. I think I set mine at 4.3 or possibly lower. Set this layer to Soft Light, 100%.
Create another Stamp. Filters>Sharpen>Sharpen. (Or whatever you use to sharpen your art.)
TEXT
Stana Katic: The Last Font I'm wasting On You set at 60 pt with a color of #828bab. Duplicate the layer. Bring the pt up to 61 and change the color to #18203b. Move below the original.
Beauty can never compare.: Respective Slanted set at 61 pt with a color of #b1c1ce. Duplicate this layer. Bring the pt up to 62 and change the color to #142d41. Move below the original.
Color Fill: ebebeb set to Color Burn, 50%. (Thanks Jumble, I think I saw you mention this...)
Watermark your art if you do, and your done
Any questions, please do not hesitate to ask.
Here is how I made this in Photoshop:
Spoiler:
Create a new document. I chose mine, 1280x800, because that is the size of my screen resolution. Fill with Black.
Take this texture:
Move around until you are happy with it.
Take this texture:
Set to Screen, 25%. Move around until you are happy with it.
Take this texture:
Set to Screen, 100%. Make sure that the left side is lined up with the left side of your document.
Take this texture:
Set to Multiply, 100%. Move around until you are happy with it.
Take this image of Stana and scale down just a little bit. I think I scaled down to 75%. Set to Screen, 100%. Do not erase anything unless it is in the way of the textures and make sure she is on the left side to middle of the document.
Create a new blank layer and move underneath the pic of Stana. With a black brush bring Stana and some of the chair she is sitting in back to the forefront. You don't have to be perfect, just make sure you can see all of her. Then with your favorite blending brush and the eraser opacity at about 50%, begin blending in the black, along with Stana, with the background. However much or little blending is your choice.
COLORING
Make sure you're on the top most layer, which should be Stana (Or whomever you chose).
Black and White: Auto, set to Soft Light, 100%.
Hue/Saturation: 0, -35, 0
Curves: Point 1: 191, 209. Point 2: 100, 106
Gradient Map: Washed Away Art #15, Set to Soft Light, 100%.
Create a stamp. Filters>Blur>Gaussian Blur. Just Blur enough that you can still tell what the art is. I think I set mine at 4.3 or possibly lower. Set this layer to Soft Light, 100%.
Create another Stamp. Filters>Sharpen>Sharpen. (Or whatever you use to sharpen your art.)
TEXT
Stana Katic: The Last Font I'm wasting On You set at 60 pt with a color of #828bab. Duplicate the layer. Bring the pt up to 61 and change the color to #18203b. Move below the original.
Beauty can never compare.: Respective Slanted set at 61 pt with a color of #b1c1ce. Duplicate this layer. Bring the pt up to 62 and change the color to #142d41. Move below the original.
Color Fill: ebebeb set to Color Burn, 50%. (Thanks Jumble, I think I saw you mention this...)
Watermark your art if you do, and your done
Any questions, please do not hesitate to ask.


Comment