
-
sigpic
Sig by ME.
-
lovely wallpaper Yamii
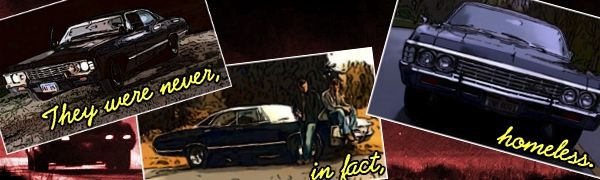
RIG- I love the Impala art ... Dean and his Impala *sigh*
Comment
-
Thank you.Originally posted by meredithe5 View Post
Here's a sig for the challenge, though I'm not really happy with it...
 sigpic
Sig by ME.Comment
-
I love the banner RIG!! Especially the txt you added about it being their home... so true.
So I made my first textures and I thought I'd share them with you all.... I'm not really sure how to make textures lol :X


Comment
-
-
Gorgeous arties and textures!
Had time for a challenge entry this week (Yay!) and used Estrela's tut for it.

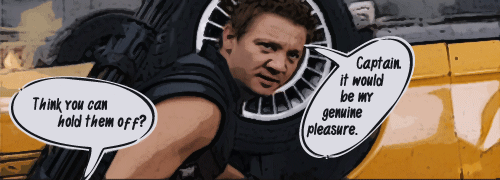
Couldn't resist the allure of turning JR's version of Hawkeye into a comic!
sigpic
To Hope AgainComment
-
Nice job lg!!
*snurches mere5's textures*
Thanks for posting that tut yamii on your gorgeous sig. *bookmarks for future use*
*goes back to writing that tut for Ikorni*sigpicComment
-
Thanks, Estrela! It was a very helpful tut, both for that sig and for that RL project I've mentioned.  sigpic
To Hope AgainComment
-
Some info on how to make this sig
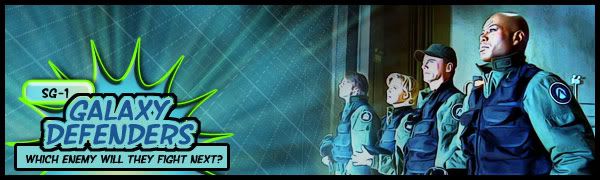
I'm sorry but a full tut's not gonna happen for this sig. As I feared, I didn't save how I created the cartooned SG-1 layer. My PSD only contains the end result. I also can't find the brush or textures I used to create the star burst and grid effects on the left side of the sig but both of these should be easy enough to recreate on your own.
What I can provide is some info on how I did the green medallion and the glass button like thing under the text. Both are shape layers.
The following info is for PS users and is spoilered for size.
Spoiler:
I hope this has made sense. If not, please ask.sigpicComment
-
Wow!! Loving all these challenge entries!
I'll be making the post almost bang on 5pm today so please get your entries in to me before then
sigpic
Artwork for AllComment
-
*snurches Mere's textures* They turned out really well, so I guess you do know how to make them after all
Comment
-
yamiinsane thanks for the tut will see if I can translate if to PaintShopProComment
-
Squeeee! Tom Hiddlestone. The wallie is lovely and in very good taste. Well done!Originally posted by yamiinsane View Post
probably we both were. I'm too lazy to scroll back and check.Originally posted by RodneyIsGodney View Post
Love your baby challenge entries and what do you mean you don't like your cartoon Impala sig? *checks RiG temperature*...You must have a fever or something ;DOriginally posted by RodneyIsGodney View Post
Neither do I. I only know I like yours.Originally posted by meredithe5 View Post
Squeeeee! Hawkeye!!! Today I'm sqeeeing a lot. Tom, Jeremy and the Impala! Way too much goodness. Great hawkeye comic, lg. It worked really well.Originally posted by ladygris View Post
Thanks for providing the tuts. The first one was most helpful and I based my challenge entries on it. I have to check this one better when I have a bit of peace and quiet.Originally posted by Estrela View Post
Lovely work everyone!sigpic
Beautiful signature and avatar by Yamiinsane. You're a mind reader!
Aristides de Sousa MendesComment


 Thank you, Estrela!


 But well, that happens!

Comment