
Originally posted by josiane
View Post
All artwork is good enough for a tut 

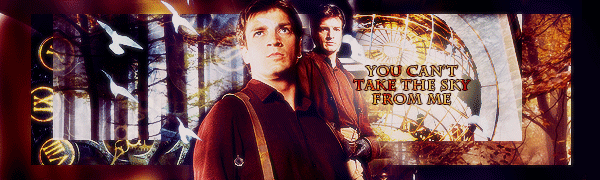
Alright, gonna try a tut for my sig posted up yonder...
For GIMP...
Spoiler:
1. open your image:
I used this one...

2. open new image, sig size
3. copy paste image of choice into sig, then move it to the left side of the sig. This becomes a new layer.
4. select eraser tool, then go into your brushes and select a smoke brush. I use these. makesure the brush is some what big so the lines are not sharp when erasing.
5. With the smoke brush go to the image layer and erase the part you don't want. In my case I erased the right side of image.
6. Repeat step 3 but shrink the image somewhat. Repeat step 5.
7. Repeat steps 3 and 5 again, shrinking the image smaller than the second time.
You should get something like this...

8. Next sharpened each individual layer then I flattened the image.
Uh...I'm a little fuzzy on what I did next. I know I played around with the layer mode. I'm so sorry. It was late when I was working on it and I stupidly didn't d save it as an .xcf after I'd saved it as a .jpg.
I know I used this texture...
...and that I "inverted" the color.
I also used a Bokeh texture/pattern that I found on DeviantArt - regularjane glitter bokeh. Sorry, I can't find it again. Can't recall the order of these two layers, sorry. Again.
The font is Jellyka Delicious Cake. You can find all the Jellyka fonts here. And it's white.
I did an "alpha to selection" on the text then select > grow (by 1) >new layer. Then I filled the new layer with the glitter bokeh pattern I used in one of the layers over the sig itself. I switched the two layers so that the bokeh layer was the background, creating a border that I then blurred via a gaussain blur of 5.0.
Okay, that's it. Sorry it's rather incomplete. If y'all have any questions please feel free to ask!
I used this one...

2. open new image, sig size
3. copy paste image of choice into sig, then move it to the left side of the sig. This becomes a new layer.
4. select eraser tool, then go into your brushes and select a smoke brush. I use these. makesure the brush is some what big so the lines are not sharp when erasing.
5. With the smoke brush go to the image layer and erase the part you don't want. In my case I erased the right side of image.
6. Repeat step 3 but shrink the image somewhat. Repeat step 5.
7. Repeat steps 3 and 5 again, shrinking the image smaller than the second time.
You should get something like this...

8. Next sharpened each individual layer then I flattened the image.
Uh...I'm a little fuzzy on what I did next. I know I played around with the layer mode. I'm so sorry. It was late when I was working on it and I stupidly didn't d save it as an .xcf after I'd saved it as a .jpg.
I know I used this texture...

...and that I "inverted" the color.
I also used a Bokeh texture/pattern that I found on DeviantArt - regularjane glitter bokeh. Sorry, I can't find it again. Can't recall the order of these two layers, sorry. Again.
The font is Jellyka Delicious Cake. You can find all the Jellyka fonts here. And it's white.
I did an "alpha to selection" on the text then select > grow (by 1) >new layer. Then I filled the new layer with the glitter bokeh pattern I used in one of the layers over the sig itself. I switched the two layers so that the bokeh layer was the background, creating a border that I then blurred via a gaussain blur of 5.0.
Okay, that's it. Sorry it's rather incomplete.
If y'all have any questions please feel free to ask!


 , and this story is ongoing since a two months now. I'm uploading to share because I'm not using everything I'm making.


Comment