Announcement

Collapse
No announcement yet.

Artwork for All - challenges, graphics, tutorials

Collapse
X
 
  • Filter
  • Time
  • Show
Clear All
new posts

    Originally posted by josiane View Post
    Thanks

    I can't deal with watching the results show without knowing the result. I have to look up the spoiler, it's too tense otherwise
    I cheat - I record it and just watch the final few minutes

    Btw, with that tut you just used, how do you copy the textures etc. that are in Quicktime? I use the snipping tool, but I'm sure there must be an easier way?

    Comment


      I started playing with josi's tut, and then went a totally different way.


      Spoiler:

      1.copy layer and set to soft light.
      2. apply box blur set at 10, and erase figure.
      3. add layer, fill with white set to 20%
      4. erase only highlighted areas.
      5. add secondary figure. This could be placed behind the white fill layer if desired. Play with it to see which looks best. I erased the edges of the second figure with a soft round brush set at 26% until I got the desired level of opacity at the edges.
      6. fonts are Ringbearer and Adorable
      sigpic

      Comment


        Originally posted by bailey1ak View Post

        m&mnm I love the Castle set you did. Very old pic/vintage look. The second wallpaper with the old style pictures turned out lovely as well.
        Thanks Bay. I'm glad you liked how your tut worked out. I'm glad the pics looked old style in the second one too - that's something I was aiming for.

        sigpic
        Coming January 2017

        Comment


          Day 5, made by BlackyKitten.....


          Comment


            And the WooHoo day 5 by Mr........

            Comment


              Nice one Blacky!
              sigpic

              Comment


                Love it Blacky.

                Mr that is a wonderful piece of art for Martin!
                sigpic

                Comment


                  Lovely advent calendars, Mr and Blacky!

                  Comment


                    Oooh, great stuff once again.
                    sigpic

                    Comment


                      Hey, all. Finished this up last night but didn't get it posted. I made it using this tut by Jeyla4ever.

                      Comment


                        That turned out quite beautiful ~lg.

                        I've been hoping to participate in this challenge, but so far all my other art obligations are monopolizing (would help if they were falling together more easily for me) my limited free time.

                        Can't wait to see what someone creates next.
                        sigpic

                        Comment


                          Thank you, Bay.

                          Comment


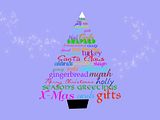
                            Okay, this one is not hard, but it is a little tedious. I haven't decided about the background yet.

                            Word Tree Tut-
                            Spoiler:

                            1. make a new file 1200 x 1000 transparent
                            2. make a new layer - using the polygonal tool, draw a large triangle (this will be your tree outline) and fill with white.
                            3. new layer - make the base and fill with black
                            4. new layer - make the snowcap and fill with white
                            5. now's the tedious part. for each Christmas related word, make a new layer and use a new font. use the white fill layer as your guide for word placement. Suggested words:
                            snow, joy, jolly, tree, mistletoe, angel, tree, gold, noel, candle, frankincense, candy, tinsel, ho ho ho, reindeer, turkey, Santa Claus, celebrate, pudding, sleigh, giving, jingle, advent, gingerbread, myrrh, Merry Christmas, holly, season's greetings, x-mas, carols, gifts (you can do these multi-colored or all the same color)
                            6. remove the white fill triangle layer so that all you have left is a transparency with the words.
                            Now all you have to do is put it on an appropriate background. I added some glitter stars. The nice part about it being a transparency is that you can resize it an use it in a variety of applications, like wall papers or sig banners.
                            sigpic

                            Comment


                              Nola, that's way cool! I'm going to have to give that a try!

                              Comment


                                It was kinda fun to do, but I did learn one important thing AFTER I did it in multi colors - be careful the colors you choose because it limits you on what background you can use. I wanted to use a navy blue background and found that one of my words totally disappeared!
                                sigpic

                                Comment

                                Working...
                                X