Welcome to GateWorld Forum! If this is your first visit, we hope you'll sign up and join our Stargate community. If you have questions, start with the FAQ. We've been going strong since 2004, are we are glad you are here.
1. Start with your main picture, position and fill the canvas with it. A few points:
- For this wp to work you need one with a relatively dark background - this one is practically black on the right hand side under where the little pics and textures are going to go. So you might want to paint in a darker background at least on the right hand side if yours isn't like that - just use a large soft brush on a new layer over the top.
- I got a lot for free from the background of this pic, including the smokiness behind Aramis. But there are lots of fab smoke textures you could use on top of your character pic if you want the same effect but don't have it in the original pic you use.
- When I'd placed Aramis where I wanted him (...) the pic didn't completely fill the canvas. So I duplicated the layer and moved the lower of the two over to the right to fill the space, then blended them in using a layer mask.
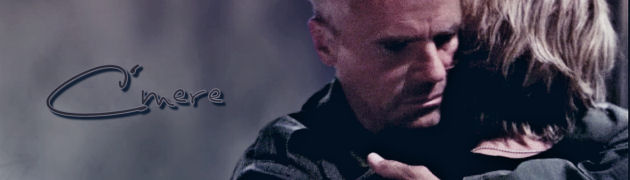
- For reference, here's what I started with!
2. Next add your little pictures. I cropped these from their originals using the rectangle select tool with a fixed ratio to make sure I had squares and then a nice even rectangle. Resize them once they're on the canvas to get them lined up nicely.
3. My pics all had different colouring to the main one, and in particular, the rectangular one was very yellow in tone, so I used image > adjustments > selective colouring on that one to take a lot of the yellowness out of it. Then, to blend them in better, add a new layer and use the rectangle select to draw round them all, then fill this with #736357 (picked from the background of the main pic using the eyedropper) and set this layer to color at 50%. This gives them more of the brownish tone of the main picture.
4. Next add the text. The fonts are Adobe Garamond and Jane Austen, colour is #e7ccba (again picked from the background with the eyedropper). Adjust the character spacing until the lines are justified to line up with the pictures above.
5. Now add this texture onto a new layer beneath the small pics/text layers but above your main pic, set to lighten. Position it nicely and then use the rectangle select tool to crop it to line up with the small pics so that it's a vertical slice underneath them and the text. Because it's on lighten, there won't be any hard edges at the top of the slice (where the texture is dark). Add a layer mask and use a large soft brush to erase the bottom of the slice - you should end up with the hard edges to either side of the small pics and text, fading away below.
6. Next add this texture and position underneath the text just slightly to the left and below.
7. Now add a new layer on top of everything, fill with #905f50 and set to overlay.
8. Add a curves adjustment layer to brighten it a bit. Not a lot though:
- Point 1: output 60, input 51
- Point 2: output 227, input 209
9. Finally make a stamp of the whole thing, sharpen and you're done
Background in this shot is actually the same ice texture minus snowflake pattern as the red dress shot; this ice texture is also the 'floor' she is standing on
This is the Assassin's Way part 17 complete "Elegant beauty is Nature. but only for the gentle and soft Flower" ~Hu Ge
"The one thing every new hairstylist must learn is how to do hair in a combat zone!" Bob; owner of Bob & Weave's Combat Salon in Red Dust Club, an original story currently in progress
I see a lot Musketeers-art ... now you got, I completely lost track about when season 2 started *argh*. Must find a source to watch - thanks for the headsup on this topic *runs off to find a source to watch the season premiere*
Princess Awinita - wonderful changes to Elsa... particularly love the colors in the dress.
Thanks! Got more colors coming {Green, light purple, dark blue, cyan, etc}
Though right now I can only really use the Filter Pack settings to remake colors {red, yellow, green, cyan, blue, magenta} so I am experimenting with Colorfy {full on color maker; however the lightness is darker and needs heavy duty tweaking. One of these days I will figure out how to make a video and upload it ot youtube as a tut on how I make Elsa art}
This is the Assassin's Way part 17 complete "Elegant beauty is Nature. but only for the gentle and soft Flower" ~Hu Ge
"The one thing every new hairstylist must learn is how to do hair in a combat zone!" Bob; owner of Bob & Weave's Combat Salon in Red Dust Club, an original story currently in progress


 :
:


Comment