Announcement

Collapse
No announcement yet.

Graphic Arts Tutorials, Textures, Resources Thread

Collapse
X
 
  • Filter
  • Time
  • Show
Clear All
new posts

    My last tut for awhile....I think...who knows! I will be busy this weekend. The oldest is graduating from High School...*sighs*

    For my latest Tony and Abbey Art:


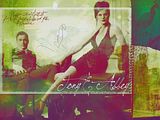
    Here's the PSD and the Step by Step tut! I'm so on a roll

    Spoiler:
    1. Take this Cap
    and crop it so that it's just Tony and Abbey and Ducky! We'll get rid of him pretty soon
    2. Set your white canvas as a new document at your desire dimensions. I think mine is 1024 x 800. Or close to that.
    3. Take this texture by yunyun
    and set it onto your canvas in normal.
    4. Drag your cropped cap erase ducky (Told you) and set to multiply.
    5. Duplicate cap above and set to darken.
    6. Add this texture
    and set to lighten.
    7. Add this texture and set to overlay.
    8. Add this texture
    and set to multiply.
    9. Add this texture
    and set to soft light.
    10. Add this texture
    and set to darken.
    11. Add this texture
    and set to multiply
    12. Add this texture
    and set to multiply at an opacity of 65%.
    13. Add this texture
    and set to lighten.
    14. Add this texture
    and set to overlay at 42% opacity.
    15. Add this texture
    and set to screen at 54 % opacity.
    16. Duplicate above texture and set to overlay at 54% opacity.
    17 Add this texture
    and set to overlay.
    18. Add text Tony and Abbey with JellykaSaint Andrews Queen font.


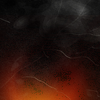
    No more textures...HORAAYYY! Now, I erased and aligned the textures to liking. Play with it and erase the edges for proper blending. I had to go back a couple of times because there were lines on the characters body parts, so just scrutinize your work.

    Now, next steps. This step also has to be followed even if you use the PSD file.

    http://www.megaupload.com/?d=0A7UQ5NU

    Once you download the PSD, if you want the coloring, you have to follow these next step since I merge the above steps and then did the coloring.

    Spoiler:
    19. Merge all visible layers.
    20. Image>Adjustment>Auto layers
    21. Image>Adjustment>Auto Color
    22. Image>Adjustment>Auto Contrast
    23. Image>Adjustment>Brightness/-15 Contrast/+26
    24. Image>Adjustment>Hue/-3 Saturation/+17 Lightness/-5
    25. Image>Adjustment>Selective Color
    REDS: +26, -4, -14, -12
    NEUTRALS: 0, -6, +5, +8
    BLACKS: -53, -1, -19, -7
    26. Smart blur


    And voila!
    Last edited by Jeyla4ever; 18 June 2009, 06:02 PM.
    sigpic

    Comment


      wow, Camy is really productive lately thanks hun!

      Originally posted by Blackpanther View Post
      I tried that, but i didn't find anything really useful. I was thinking of using screen caps, but stretching those to wallpaper size makes them pixelated. I was hoping someone would have some better pics.
      hmm, and did you try the gallery of GateWorld?

      Comment


        camy thanks for the tuts - personally as there seem to be a few probs with the PSD downloads I would prefer instructions
        sigpic
        Sig by me my LJ - the place to find some of my artwork and fics - My Stargate vids

        Comment


          That's good to know bandcat. Is it just my downloads or the downloads in general in Megaupload? Just wondering, maybe I could find another site or something.

          Yup, Fainne! I hadn't done something in like ages it seemed, I was thirsty and hungry for the artistic kill in me! Plus, I've had some really tough several months so this was refreshing and therapeutic!
          sigpic

          Comment


            Thanks for the wonderful tutorials, Camy. Your artwork is amazing!!
            sigpic
            Thanks to Jumble for the icon and siggy.
            My ff.net My Own Website

            Comment


              got a question for you Cammy; how'd you get rid of the lines for the first Tony/Abby wallpaper?

              It's Complicated Butterflies and Hurricanes

              Comment


                Originally posted by Camy View Post
                That's good to know bandcat. Is it just my downloads or the downloads in general in Megaupload? Just wondering, maybe I could find another site or something.

                Yup, Fainne! I hadn't done something in like ages it seemed, I was thirsty and hungry for the artistic kill in me! Plus, I've had some really tough several months so this was refreshing and therapeutic!
                camy some of your PSDs downloaded fine but a couple seemed to have all the layers flattened thats all I don't have a problem with megaupload as such most of the time
                sigpic
                Sig by me my LJ - the place to find some of my artwork and fics - My Stargate vids

                Comment


                  Originally posted by Elizabeth Bartlett View Post
                  got a question for you Cammy; how'd you get rid of the lines for the first Tony/Abby wallpaper?
                  What lines, sweetie? I'm gonna look back.

                  Are you referring to the lines in the notebook texture? if that's what you mean, when I darkened the texture, it took out most of them and then I just erased them and I think I set the opacity lighter too. Hope that helps. Let me know.
                  sigpic

                  Comment


                    Colouring and Tutorial for that icon


                    Step by Step under spoiler tags or PSD HERE!
                    Spoiler:
                    1. create a new canvas 100x100px and paste this texture into your canvas.

                    2. (personal step) resize crop and blend your pics in the way you prefer.

                    3. layer>new adjustment layer> selective color.
                    reds: -50,-25,-6,30
                    yellows: -100, 0, +36,0
                    cyans: -100,-100,100,100
                    magentas: 100,-100,100,100
                    whites: 100,-100,100,100
                    neutrals: 15,0,-11,-13

                    4. layer>new adjustments layer>curves
                    output: 150; input:120

                    5. duplicate your curves layer.

                    6. layer>new adjustment layer> selective color
                    reds: -30,+10,0,0
                    neutrals: 11,2,-6

                    7. layer>new fill layer > solid color #555555. set it to lighten

                    merge layers and shapen it once if you like and it is done


                    more examples with the same colouring:
                    and
                    sigpic

                    Comment


                      Originally posted by Camy View Post
                      What lines, sweetie? I'm gonna look back.

                      Are you referring to the lines in the notebook texture? if that's what you mean, when I darkened the texture, it took out most of them and then I just erased them and I think I set the opacity lighter too. Hope that helps. Let me know.
                      I think my problem was that the images weren't that big for the doc 'cause I kept getting lines for each of the textures, so I think the problem was on my end but thanks for the advice!

                      It's Complicated Butterflies and Hurricanes

                      Comment


                        thanks for the tut rachel

                        donna your wp looks great
                        sigpic
                        Sig by me my LJ - the place to find some of my artwork and fics - My Stargate vids

                        Comment


                          Originally posted by bandcat View Post
                          thanks for the tut rachel

                          donna your wp looks great
                          thanx
                          Sig Bye Me and Avi bye Luciana

                          Comment


                            Hey Camy, could you post a step by step tut for your Tony/Ziva artwork. I really wanna try out some Sam/Jack stuff for it!

                            Thanks hon

                            Comment


                              Awesome artwork everyone
                              Sig Bye Me and Avi bye Luciana

                              Comment


                                I tried the icon tutorial Rachel posted last night but my version of Photoshop is being an @ss, the coloring came out really strange... (this is why I need a new version )

                                It's Complicated Butterflies and Hurricanes

                                Comment

                                Working...
                                X