Announcement

Collapse
No announcement yet.

Artwork for All - challenges, graphics, tutorials

Collapse
X
 
  • Filter
  • Time
  • Show
Clear All
new posts

    Great Neville and Jennifer Lawerance art.
    Icon by AceofHadeon Sig by TrueRomantic

    sigpic

    Comment


      Originally posted by meredithe5 View Post
      Thanks JW I had a lot of fun making the Neville banner... I actually added a layer that made it look more cartoony but then I softened it.. a lot lol.

      As for following tutorials I think it's a mixture of following the directions and making it your own. There are tons of great ones here on AFA and out on the web but things like coloring can all change based on the pictures you use. I love tuts because each time I use one I learn something new about Photoshop

      Ps: I love your sig JW... I finally saw The Hobbit and loved Thorin!!
      I love following tuts as well for the same reasons. But I got a little frustrated with a couple I followed recently.

      Thank you. Uh, I love Thorin as well Well, obviously. Most of my art has been Thorin related. But this sig is a simple crop of a still. But it works well, I think.
      sigpic
      Beautiful signature and avatar by Yamiinsane. You're a mind reader!
      Aristides de Sousa Mendes

      Comment


        Thanks Padme
        sigpic

        Comment


          My Challenge entry:

          Icon by AceofHadeon Sig by TrueRomantic

          sigpic

          Comment


            Love it Padme!! I just started watching season 1
            sigpic

            Comment


              Love it, love it, love it!

              I have to do some Asajj Ventress art. What can I say? I like the dark side
              sigpic
              Beautiful signature and avatar by Yamiinsane. You're a mind reader!
              Aristides de Sousa Mendes

              Comment


                Originally posted by meredithe5 View Post
                Love it Padme!! I just started watching season 1
                Thank you! It's a great show, it's a shame Disney is not going to continue it in show form. There are more produced episodes, but we don't know yet how we will be getting those. Ahsoka has come so far since she was first introduced too.

                Originally posted by JadedWraith View Post
                Love it, love it, love it!

                I have to do some Asajj Ventress art. What can I say? I like the dark side
                Thank you. I'll always be a Jedi at heart.
                Icon by AceofHadeon Sig by TrueRomantic

                sigpic

                Comment


                  Here is the tut Mane asked for...

                  How to make this in Photoshop CS5. This should be translatable. I should also say that I snurched most of these from lg's album of misc. stocks/textures.


                  Textures/Stock needed:

                  Spoiler:


                  Spoiler:

                  BASE

                  1) Open a new document to whatever size you like, I chose 500x180. Fill with black.

                  2) Open the fractal texture and place it on your canvas. Resize and set it to Normal, 40%.

                  3) Open the owl/flowers texture and place it on your canvas. I did not resize but that is up to you. Set to Screen, 20 (I wanted the flowers there but not completely noticeable.)

                  4) Open the clouds/lightning stock and place it on your canvas. Do not resize and place whereever you wish the lightning to go. Set to Screen, 100%.

                  This is what your canvas should resemble:


                  5) Add your character/person and resize to fit your canvas (If need be.) Cut them out with either a small soft edged brush or a small hard edged brush. Just make sure your character/person is cut out completely.

                  6) Add this lights texture. Resize to just over half of the width of your canvas. Set to Lighten, 30%. Move to the left of the canvas.

                  7) Add this dove to the right of your character/person. Set to Soft Light, 100%. Resize and blend into the rest of the canvas.

                  This is what your canvas should resemble:


                  8) Add this forest and do not resize, place where you like it. Set to Overlay, 10%.

                  9) Add these glowing lights and do not resize (unless the width is not 500 pixels, then resize to the width.) Create a layer mask and, using your favorite blending brush, erase most of the stock. Try to leave as much of the gold glow as possible. Set to Normal, 100%.

                  10) Create a new transparent layer. And using the first brush in this pack, Grunge Brushes 2 by Talei-Stock, lower the size of the brush to roughly 150 with an opacity of 50%, color: #e1bb8c. Brush onto areas that look to not have that much of goldish color. Set to Overlay, 100%.

                  This is what your canvas should resemble:


                  COLORING

                  Curves Layer: Preset: Increased Contrast (RGB)
                  Gradient Map: Washed Away Art Set 2, Gradient #4. Reverse and set to Soft Light, 30%.
                  Gradient Map: Washed Away Art Set 4, Gradient #4. Set to Soft Light, 100%.
                  Photo Filter: Cooling Filter (LBB) Density: 25%.
                  Gradient Map: Washed Away Art Set 5, Gradient #13. Reverse and set to Soft Light, 100%.
                  Hue/Saturation: Colorize checkmarked. 173, 25, 0. Set to Screen, 50%.
                  Levels: 0, .62, 255. Rest Default.
                  This is what your canvas should resemble:


                  FINISHING TOUCHES

                  Create three stamps (Shift+Ctrl+Alt+E) and hide the top two. On the first stamp, Gaussian Blur at .6 pixels. Lower the opacity of this layer to 40%.
                  On the second stamp use the filter Smart Sharpen. Make sure your in the Advanced part of the filter. These are my settings (I don't remember if they are default or not.) Under the Sharpen tab: Amount: 37, Radius: 14.9, Remove: Gaussian Blur, More Accurate checked. Under the Shadow tab: 19, 29, 37. Under the Highlight tab: 16, 29, 51. Lower the opacity to 40%.
                  On the third stamp, I used Topaz Clean Crispstyle with an opacity of 60%. If you don't have Topaz, just use whatever filter you think would look right with your art.
                  I then created another stamp of all my work so far. This time I used Paint Daubs. Brush Size: 1, Sharpness: 1, Brush type: Simple. Opacity 40%.

                  TEXT

                  "Tarn Vedra has never had a more beautiful Sun": Myriad Pro, 12 pt. Vertical Scale: 110%, Horizontal Scale: 125%. Color: #e1bb8c. Set to Soft Light, 100%. Right-click and go to Blending Options. Drop Shadow: All Default except Distance: 0, and Spread: 39.
                  "Trance Gemini": Montegue, 30 pt. Vertical Scale: 110%, Horizontal Scale: 125%. Color: #e1bb8c. Set to Soft Light, 100%. Blending Option Drop Shadow: All Default except Distance: 0, and Spread: 40.
                  Watermark your work, if you do.

                  And you are finished!

                  Finished product:


                  Let me know if there is something you don't understand
                  sigpic
                  Icon and Sig by me.

                  Comment


                    Thanks for the tut! Looks great and most of that should work on CS2 as well. Only, I don't understand how you resize a picture after superimposing it as a layer, I always do it before, while it's still a separate picture. I don't have Topaz, though.
                    sigpic

                    Comment


                      Brilliant work Mere, Yami, Hyn and Padme

                      Don't forget to send your challenge entries to Sarai

                      Comment


                        Originally posted by maneth View Post
                        Thanks for the tut! Looks great and most of that should work on CS2 as well. Only, I don't understand how you resize a picture after superimposing it as a layer, I always do it before, while it's still a separate picture. I don't have Topaz, though.
                        You are welcome, Mane! I use Free Transform after I get the image onto the canvas. (Edit>Free Transform, I believe) You can enter the percent amount you want at the top or you can use the 8 "markers" that are around the image. To ensure that your images stay looking like they are supposed to, all you have to do is hold the Shift button down when dragging one of those "markers" (I hope that makes sense, it's 4 am here and I only woke up a few minutes ago...)

                        Thanks Jumble
                        sigpic
                        Icon and Sig by me.

                        Comment


                          Originally posted by yamiinsane View Post
                          You are welcome, Mane! I use Free Transform after I get the image onto the canvas. (Edit>Free Transform, I believe) You can enter the percent amount you want at the top or you can use the 8 "markers" that are around the image. To ensure that your images stay looking like they are supposed to, all you have to do is hold the Shift button down when dragging one of those "markers" (I hope that makes sense, it's 4 am here and I only woke up a few minutes ago...)

                          Thanks Jumble
                          Nice tip andtaht's a tut I'll try later.

                          Love your current Martin sig, Jumble.
                          sigpic
                          Beautiful signature and avatar by Yamiinsane. You're a mind reader!
                          Aristides de Sousa Mendes

                          Comment


                            Thanks JW

                            Comment


                              I'm still waiting for the cake, though I heard someone mentioning a chocolate one

                              Lately I'm trying tuts without actually adding my favourite characters to them, Is it a bad sign that I'm only building bases?
                              sigpic
                              Beautiful signature and avatar by Yamiinsane. You're a mind reader!
                              Aristides de Sousa Mendes

                              Comment


                                I use transform constantly! I couldn't do work without it. To use it, I just hit CTRL + T which puts the transform "box" around the image to be manipulated. Free transform can be used by dragging one of the corners (holding shift to maintain perspective) or literally free without the shift to skew the image. Or you can rotate the image by going near the corner and when your cursor gets curved, pull it and the whole image will rotate. If you hold shift while rotating, it will do it in specific increments (I think 10 or 15 degrees at a time) For more detailed transformations, go into Edit after putting the transform box on your image, and select one of many options such as flip horizontal or vertical, rotate 90/180 degrees, etc.

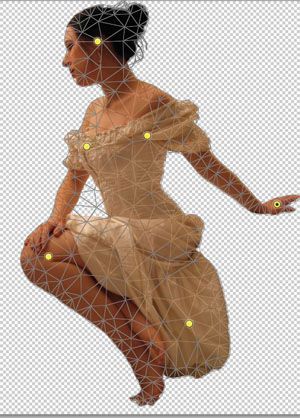
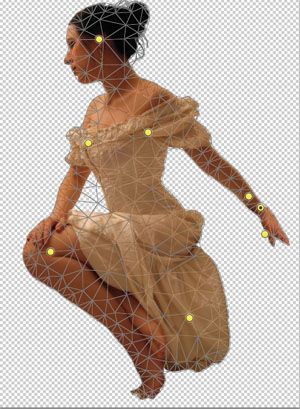
                                Another really fun option is Puppet Warp. That puts a grid map over your image and allows you to manipulate just a portion of the image. For example, you can change the position of just the hand, not the whole body. It's important to put anchor points on several key places that you don't want to move, to hold them steady and just move the anchor points you place on the area you DO want to move.
                                sigpic

                                Comment

                                Working...
                                X