
Great arties so far!
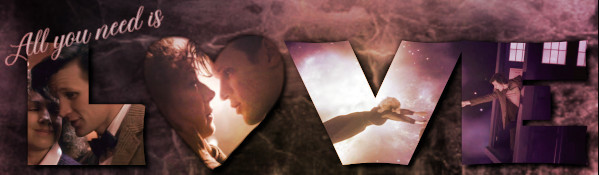
Here's the tut mane and Jumble asked for.
To make this in PS:

NOTE: I have included instructions for GIMP users for a similar effect. This has no selective coloring, just a gradient map.
If you've got any questions, please ask.
Here's the tut mane and Jumble asked for.
To make this in PS:

NOTE: I have included instructions for GIMP users for a similar effect. This has no selective coloring, just a gradient map.
Spoiler:
You will need: 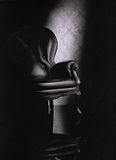


Open your canvas to whatever size you need and fill with white.
Open your first image, the black couch, and paste into your canvas. Scale up or down as needed and position wherever you want it.
Open the second image, the torn edge. Go to Image-->Adjustments-->Invert. (In GIMP, Color-->Invert) Rotate 90 degrees clockwise (Edit-->Tranform) and set to Screen, opacity 51% and fill 42%. (GIMP doesn't have fill, so don't worry about it.) Scale up or down as needed and place on the left side of the canvas, letting a few of the feathers show.
Open the third image, the texture. Scale and position as desired. Set to Screen, opacity 100%. Go to Filters-->Blur-->Gaussian blur and raise it until the lettering has been obliterated but you still have the lighting effect.
Duplicate this layer. Set the duplicated layer to Overlay, opacity 50%.
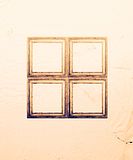
Open the fourth image, the squares. Desaturate it (Image-->Adjustments-->Desaturate in PS, Color-->Desaturate-->Luminosity in GIMP), invert the colors, and set to Lighten Only, opacity 20%. Scale up and position as needed.
Duplicate this layer as well. Move it around so that you've got the texture at different parts of the canvas.
Add a gradient map of #16161d to #ffffff. (In GIMP, go to Layers-->New Layer. Fill with color #16161d.) Set to Overlay, opacity 100%.
Make a stamp. (Ctrl—Alt—Shift—E in PS, Layer-->New from Visible in GIMP.) Duplicate that layer and scale down until you've got a smaller square in the center. Add a Stroke of around 50 px for a wallie, or however large you want it, in color #fafafa. (In PS and GIMP, you should find this under Edit-->Stroke.)
Add a color fill layer with color #796958. (Layer-->Fill Layers-->Solid Color in PS, Layer-->New Layer in GIMP.) Set to color, opacity 100%. Using either your eraser or layer mask, “erase” the color from around the background, leaving it only over the middle square.
Open your fifth image, your character. Using either your eraser or magic wand, cut out the character. Position him/her wherever you want them on the wallie. Off to one side works best. Duplicate this layer, set to Overlay, opacity 24%, and desaturate the overlay layer. This removes a lot of the reds from the character.
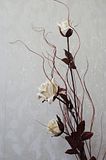
Open your final image, the rose. Scale down this very large stock and set to Overlay, opacity 100%. Position it behind your character and color layer so that the twirly things come up around your character and over your entire piece.
TEXT
And you're done. Relatively easy wallie.


Open your canvas to whatever size you need and fill with white.
Open your first image, the black couch, and paste into your canvas. Scale up or down as needed and position wherever you want it.
Open the second image, the torn edge. Go to Image-->Adjustments-->Invert. (In GIMP, Color-->Invert) Rotate 90 degrees clockwise (Edit-->Tranform) and set to Screen, opacity 51% and fill 42%. (GIMP doesn't have fill, so don't worry about it.) Scale up or down as needed and place on the left side of the canvas, letting a few of the feathers show.
Open the third image, the texture. Scale and position as desired. Set to Screen, opacity 100%. Go to Filters-->Blur-->Gaussian blur and raise it until the lettering has been obliterated but you still have the lighting effect.
Duplicate this layer. Set the duplicated layer to Overlay, opacity 50%.
Open the fourth image, the squares. Desaturate it (Image-->Adjustments-->Desaturate in PS, Color-->Desaturate-->Luminosity in GIMP), invert the colors, and set to Lighten Only, opacity 20%. Scale up and position as needed.
Duplicate this layer as well. Move it around so that you've got the texture at different parts of the canvas.
Add a gradient map of #16161d to #ffffff. (In GIMP, go to Layers-->New Layer. Fill with color #16161d.) Set to Overlay, opacity 100%.
Make a stamp. (Ctrl—Alt—Shift—E in PS, Layer-->New from Visible in GIMP.) Duplicate that layer and scale down until you've got a smaller square in the center. Add a Stroke of around 50 px for a wallie, or however large you want it, in color #fafafa. (In PS and GIMP, you should find this under Edit-->Stroke.)
Add a color fill layer with color #796958. (Layer-->Fill Layers-->Solid Color in PS, Layer-->New Layer in GIMP.) Set to color, opacity 100%. Using either your eraser or layer mask, “erase” the color from around the background, leaving it only over the middle square.
Open your fifth image, your character. Using either your eraser or magic wand, cut out the character. Position him/her wherever you want them on the wallie. Off to one side works best. Duplicate this layer, set to Overlay, opacity 24%, and desaturate the overlay layer. This removes a lot of the reds from the character.
Open your final image, the rose. Scale down this very large stock and set to Overlay, opacity 100%. Position it behind your character and color layer so that the twirly things come up around your character and over your entire piece.
TEXT
Spoiler:
For this one, I used Caviar Dreams, all caps, 29 pts, in color #141417 for the text around the square. Place the text as needed. For the “It's all about the character,” I used the same font in color #fbebda, sizing the word “character” in a larger size than the other. Position whatever text you want for this part in the middle of your brown area.
And you're done. Relatively easy wallie.
If you've got any questions, please ask.
 Thunking majorly over Jeremy's art. Good thing its cold outside. *phew*

 Thanks.


Comment